
The iM@S2 Demo for the Linguistically Impaired
Hey, folks, the PS3 iDOLM@STER2 trial version is out for those of you with Japanese PSN accounts. I figure that, since a lot of people (and not necessarily those planning on picking up the full game) will probably be giving it a try, I’d just quickly run through what the demo gives you to play around with.
Actually, from the details they released yesterday, they kind of suggested that they’ve be covering the first six weeks of the game (basically, all the tutorial stuff – if you play the game, it actually makes a lot of sense that they’d leave things there). As it turns out, they’re only presenting you one week of game, and week five rather strangely. This does mean that I’m now sitting on a really rather long tutorial post for the game that I guess I’ll be sitting on for a couple of weeks.
Anyway, starting up the trial, there’s not really a main menu – hitting start just drops you straight into the game. It’ll first ask you to select your units leader – there’s not much significance to this for the basis of this demo, rather it’ll just effect where the girls you select stand during performances. Hitting the Triangle button over a particular girl will allow you to view their introduction video, should you wish to.
Just hit the ‘X’ button over the girl you want as your unit leader, then select Yes (ã¯ã„) to continue. The game will then pretty much immediately ask you to select your other two unit members, which works exactly the same way, except you are selecting two people.
What follows is then the Morning Communication section. In the full game, from about week five onwards, you are given the opportunity to exchange a few words with your idols before heading out to work for the day (well, week as the game encapsulates it). You select the idol you want to talk to, and then you’ll talk to them about either themselves or the unit. There’s not really any sense in worrying about it for the trial version, but you’ll then be prompted to make a response – either positively or negatively (the actually positioning of each response changes every time, so I can’t just say that Square is Positive or whatever). If you don’t make a response within the time limit, the game will pick one for you.
The result of this is dependant on whether you are talking specifically about the idol, or about the unit. If it’s just the idol, a positive response will boost the idols mood at the expensive of the other unit members, whilst a negative response will do the opposite. If you are talking about the unit, the response will affect all unit members either positively or negatively. If one or more unit members mood (and the game doesn’t give you an indicator for this) gets significantly behind or ahead of the others, then it’ll start causing issues for your unit.
For the sake of the demo, just pick one at random. I will say that Hibikis angry pose is bizarrely adorable.
The game then throws you to the Scheduling screen. This is the bread-and-butter of iM@S gameplay – for each week of the game, you select scheduled events to perform. You have two scheduling slots, and between the two slots you can schedule up to three blocks worth of events from the map.
You’ll note that the map is split up into six different regions, each of which have a separate fan total and mood indicator. It’s not really worth worrying about this for the sake of the demo – for the full game, individual fan totals and moods effect your potential single sales.
What is important for now, though, is that you can tab between the different regions using the L1/R1 buttons. So, select your Scheduling slot using the d-pad and the X button, then pick what it is you want to do (You can use Square to cancel a selection if you need to). From the left most point of the map, the options are…
Promotional Event – a AVG/VN style dialogue based skit based around your idol at a promotional event
Festival “Odyssey” – Perform against another unit at a music festival, in this case, Jupiter
Paid Promotional Event – like a regular promotion, except you pay for it.
Festival “Fujisan Rock” – Go up against Ryuuguu Komachi at a festival.
Vocal Lesson – Boost your stats with a vocal lesson!
Quintet Live – Perform at a live event, with two special guests of your choosing.
Just choose the option you want to try out then proceed by hitting the circle button, then confirm that you’ve made the correct selections. All the performance-type events take a full day, errr, week, but you can do a Promotion and a Lesson during the same schedule as they only take two and one blocks respectively.
Immediately following you selecting your schedule, you’ll be asked if you want to change your stage costume – the game gives you stats enough to be able to win any of the audition events it throws at you unmodified, but it does at least give you some costume parts to play around with if you want. The left (square) option takes you to the costume screen, whilst right (circle) continues onwards.
Most of the costume screen is, conveniently, in English. You get multiple tabs labelled “Coorde’ (for Coordinate, one would imagine) that you can tab between with the L1/R1 buttons, but those are kind of pointless here – it lets you short-cut particular costume load outs for when you are playing the full game.
Anyway, initially you’ll only have the one costume part assigned – the costume The Wild Strawberry. Curiously, it’s different to the default costume on 360 (Vital Sunflower, which at least still available here). Anyway, if you select the Costume section with the X button, you’ll be taken to another set of tabs.
Just to explain this, there are four categories of costume in iM@S2. Floral, Luxury and Starry are the three base costume types – these represent Vocal, Dance and Visual Images respectively, and whilst they can effect all three of your image types (to varying degrees), they’ll primary effect that main area. Everything under each one of those tabs is a colour variation of that same costume (just select one and have a look).
Extend costumes are, on the other hand, unique costumes. Although the name may suggest it, even in the full game these aren’t all DLC. Some of these costumes you purchase with in game money, some of them can be unlocked by reaching certain requirements in game. Some will be DLC (like the Miku costume), but there’ll also be colour variants of the standard costumes you can only get that way too. The demo gives you three Extend costumes to play with – you can tell what their primary Image is based on the colour of the star at the upper right of the yellow information box (or by just looking at your stats at the top right of the screen, unlike in iM@S1 where it wouldn’t indicate the difference until after you’d finished selecting your costume).
Not that it really makes much difference – just pick what you like the look of, then hit circle to go back. Having selected your costume, you can hit Triangle to cycle through your unit members to see how they look.
Once you’ve picked your main costume, you can then add your accessories. There’s no tabs or anything here, just a list of the unlocked costume parts. Again, the star in the description box indicates the accessories Image type.
The final box, Amulet, allows you to equip an item which has effects on your Performance scoring. It’ll possibly sound like gibberish at the moment, but the options from left to right are…
Neburin-chan – Increases the points value of your Visual appeals as small amount
Akari-kun – Increases the amount of Voltage you gain from appeals
Shigaranuki – Increases the points value of your Dance appeals as small amount
Norigorou – Increases the points value of your Vocal appeals as small amount
I’d be inclined to go with Akari-kun if you are doing a Festival, but that’s just me.
Once you’ve finished with your costume selection, hit Circle, then confirm your selection.
(Fun fact whilst I’m thinking about it – you can make the circles on the loading screen bounce using the Square, Circle and Triangle buttons – made more sense on the 360 where the Appeal colours matched the buttons, although I’ll mention that the different Appeal colours were set by the original Arcade game).
The game will then ask you if you are really sure you’ve got the right costume – hitting square again here will take you back to the costuming screen, whilst Circle will continue onwards. How the game continues on from this point will depend on what you have picked to do.
The Festivals and the Quintet Live are both Performance type events, and whilst the strategy surrounding playing them is different, the build-up to them is the same aside from one thing – the Quintet Live will ask you to select your Guest characters first (in the same fashion as you did your Unit members, though here it lets you select Ryuuguu Komachi members too).
Before your idols go on stage, they’ll perform something of a battle cry – they’ll count down from three, then you’ll see one of the idols saying something (accompanied by a Pac-Man voice). You’ll then have to pick, from a choice of two, what they were saying. Again, demo, so getting it wrong isn’t an issue. Which is probably just as well – the mouth movements are a little on the fish-flappy side of things. Combined with the facial expression pulled, these are all unique though, and based on the number of times they close their mouths entirely, it’s usually pretty easy to ascertain what they are saying based on the punctuation of the options made available to you (“Touch” and “Top Idol” may be tricky, as they both appear to be spoken as one word). All this stuff has an effect on your units Danketsu (Unity) in the full game, not that you need to worry about that here.
(Tip – if they pull a strangely cute angry face during this, they’re probably saying “Fight! Oooo!” – Not that this knowledge will help you if you don’t know katakana).
Next, you’ll be asked if you need an explanation of how to play the event – left (square) is Yes, right (circle) is No. If you pick Yes, Kotori will appear out of nowhere in her usual Advice Ninja-like fashion to run you through the basics. Really, given that she knows everything, I’m surprised Kotori hasn’t been promoted to Producer…
Anyway, onto the performance itself.
The key to performances is that you score points by making what the game refers to as Appeals to the audience. There’s three standard types of appeal – Dance (blue, square button), Visual (yellow, triangle) and Vocal (red, circle). Yes, once again, these made more sense on 360 where they colour-coordinated with the buttons. There’s three circles at the bottom of the screen which represent these appeals, and a circle will pulse out from their centres at a rate based upon the BPM of the song you are performing (READY!!, in the case of the demo). The idea is to make an appeal at the point when the pulsing circle hits the rim of the contained area, and for each beat you can make a single appeal of any type you choose.
Now, you’ll also notice that each Appeal type has a multiplier assigned to it. As you make an appeal of that sort, the multiplier for it will go down, and another multiplier will go up. What you actually score for each appeal is based upon this multiplier and your combined stats for the Image category of appeal you are making, adjusted by the BPM of the song. So, as you can probably see, it’s not a good idea to just keep making the same kind of appeal over and over.
Speaking of the BPM, note that in the full game you get fewer points per appeal for high BPM songs to account for the fact that you get more appeal chances. You do get a Chain bonus for each successive “perfect†appeal you make – if your timing is good, and you can fully chain a song, it can pay dividends to pick a high BPM track, though it can be easier to score highly on lower BPM songs.
Also note that there’s the Voltage gauge in the top left corner of the screen – this fills as you hit Perfect appeals. Once it hits full, you score some bonus points (and a few beats break from pressing buttons), and then can either continue or perform a Burst Appeal by pressing the R1 button.
A burst appeal is a special type of appeal in which one idol (who you can select before hand using the L1 button) will do an extended solo appeal to the audience. The button presses for this are fixed, the exact pattern depending on which idol is making the appeal (typically, they’ll have more button presses for the areas in which they are strong). The scoring for this is based upon what the modifiers were standing at before Bursting (though doubled), multiplied by your Danketsu gauge rather than your individual stats.
(The Danketsu (or Unity) gauge is that circle thing to the right of the unit information at the top-right of the screen – the demo has it pretty much full. In the full game, it starts out so small that Burst Appeals actually score less than regular ones).
The pro-tip with Burst Appeals is that, towards the end of the song, you should keep ahold of it until the last minute if possible. The last appealable beat of the song isn’t actually at the end of the song by a fair margin, so if you Burst Appeal on this final beat, you get the appeals you make as part of the burst as extras, meaning you can squeeze in some extra points from that which you wouldn’t have gotten otherwise. This isn’t always the best idea at Festivals, though.
Once you’ve Burst Appealed, the Voltage gauge will be reset, and your multipliers will also have been altered – generally back upwards, but to where will depend on which idol did the Burst appeal. For Chihaya, for example, you’ll tend to find that the Vocal multiplier is set way higher than the others.
There’s also one other type of appeal – a Memories appeal. The number of these you get for each performance is dependant on your current Memories level (the trial version gives you three, though you only start with one in the actual game). This is done by hitting the X Button in time to the BPM, as with a regular appeal. Like a burst appeal, the appeal will be done with your currently selected idol, and will score you points as if you made two or three successful appeals in each area. It’ll also adjust your multipliers and give a big voltage boost, so be a little careful about it’s timing.
(Super pro-tip – I don’t think the game ever actually tells you this, but there’s such a thing as Double or Triple Appeals. The demo actually gives you three Memories Appeals to play with, so if you use them successively with different idols (as in, Memories appeal, L1 to idol 2, Memories appeal, L1 to idol 3, Memories appeal), you’ll get successively more points and a bigger voltage boosts as two or three idols perform a special appeal concurrently. It’s very useful under certain circumstances, mainly festival performances).
The numbers in the top right of the screen indicate your performance based upon the requirements for passing this Performance – in the case of the Quintet Live, you need to get that figure up to 2.0 or above to pass. For the Festivals, you need to outscore your opponent.
Festivals are actually how the “Boss” battles, as it were (and as it presents them here) are performed in the game. You need to outscore your opponent to win. You’ll note that, unlike with the Quintet Live, you can also see a Voltage Gauge for your opponent, which will fill as the song progresses. You need to be wary of this – if they pull of a Burst Appeal, then not only does your own Voltage Gauge drop, but you will be unable to perform Appeals at all for it’s duration. They’ll score big points for it, too.
Of course, the opposite is also true – this is why I suggest that Amulets that increase your Voltage gain are useful for Festivals. A large part of festival performances is stopping your opponents from Bursting – using your Memories appeals will actually also drop their Voltage Gauge at the same time as it increases yours. Double and Triple Appealing can do big damage, but you also need to be careful as your opponent has an undisclosed number of Memory Appeals to make as well.
Anyway, if you win the Performance event, you’ll get the chance to watch your unit perform uncluttered by the UI. If it’s the Quintet Live, then it’ll play tense by pretending that your Guests won’t show up (this won’t happen here, but it quite possible in the full game! Happens to me frequently, even when my guests are in a good mood).
Annoyingly, they cut the performance halfway through, which is a bit of a shame.
By the way, if it’s a festival you are performing at, you might want to try losing – it’ll give you the option to retry if you want to, but if you select No, it’ll actually let you watch part of your opponents performance. You’ll get Alice or Guilty if it’s Jupiter, or Nanairo Botan (or button or whatever) if it’s Ryuuguu Komachi. I still think that new Ryuuguu costume is really ugly, by the way.
If you went for one of the Promotional events, then there’s rather less to explain – it’s a straight VN-type event. The tricky part is that you may get a screen like this…
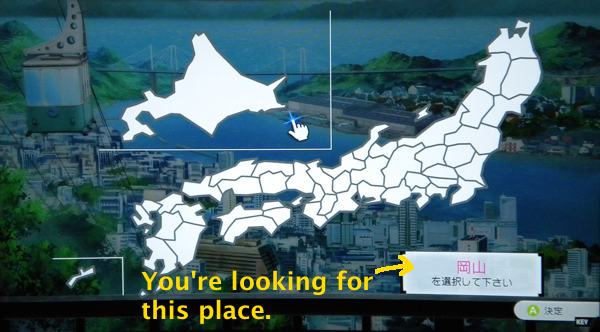
Yup, it’s a geography quiz of sorts. If the screen is similar to the above, it’s asking you to locate that prefecture on the map – you probably want to refer to one of these.
Actually, I’ve not had it in the trial, but it may instead show you the outline of a prefecture and ask you to pick the correct name. If it’s like the 360 game, copious use of the pause button on the controller is your friend here.
Saying that, it’s not really important for the trial – getting this right increases Danketsu, but since you aren’t performing, it doesn’t really matter.
Onto the event itself, it’s just a bunch of talking, punctuated with a couple of conversation selection points. From a gameplay perspective, there are right and wrong answers here – getting the best answer for each selection bags you a “Perfect Communication”. It doesn’t effect the fan or cash gain for the event, but it does alter the gain to the Memories Gauge you get as a result.
If you really want to get this right, you can refer to the Perfect Comms guide on the Japanese iM@S2 wiki (to shortcut you – Haruka, Miki, Chihaya, Yayoi, Yukiho, Makoto, Mami, Takane and Hibiki). The actual events are, for the unpaid Promotion, “エã‚ストラã®ãŠä»•äº‹” (Extra work (as in, being an Extra in something) – should be in the second table), and for the paid Promotion “PVã®ãŠä»•äº‹” (PV work – should be in the fifth table). You can just pause the game when the selections pop up and sill match the text easily enough.
In the full game there’s also occasionally Touch points (as in, touch a part of your idol to progress, typically the head or hand, rather than select dialogue to progress), but I don’t think there’s any of that here. Just as well, you’ve not been through that Vending Machine training sequence that has reduced many a non-Japanese speaker to tears. Well, okay, to looking on the internet.
Just as a note, you’ll probably get funnier reactions by picking the wrong things. Just saying.
As for the Vocal lesson, well, it’s a simple Bemani-esque button pressing thing. Not too much to explain. As with the first time you attend any event, you are first asked if you want Kotori to drop down from the ceiling to explain what’s up (well, she doesn’t really drop down from the ceiling, but I like to imagine it that way) – as always with these things, Square is Yes, Circle is No.
Once you progress to the actual lesson part of the lesson, you’ll be presented with an undulating course at the bottom of the screen, along which a short series of button icons will progress. The idea is to hit the button in question as it crosses the Microphone icon. If you get all of them right, the course will disappear, the lesson gauge in the upper corner of the screen will increase, and you’ll then be presented with another course and series of buttons. As you go on, the courses will get more complicated in shape, the button presses more varied, the speed will increase, and you’ll score more per series. If you miss a button press, the icons will reverse back down the course a little, but the lesson timer will continue. Get several wrong in one series, and the course will disappear, and it’s level will degrade.
Also, you can hold down the L1/R1 button to accelerate progress down the course, should you be confident in your button positional knowledge and timing. This means you can get through more series and improve your chances of filling the gauge, not that it makes much difference giving this is a demo.
(This might just be me being a little colourblind, but I kind of feel the 360 version had rather more distinctive colours for the different buttons, but it’s not a big deal).
After that, it’s just straight dialogue and advertisements until the end of the demo.